

The Motion Picture Negative (V): Scanning, Digital Intermediate and 4K Restoration
ON FILM & DIGITAL · Technical Article
The Motion Picture Negative
Part V: scanning, Digital Intermediate, 4K restorations and the contemporary workflow
By Ignacio Aguilar AEC, cinematographer
Spanish original: El Negativo Cinematográfico (V): escaneado, Digital Intermediate, restauraciones 4K y flujo contemporáneo
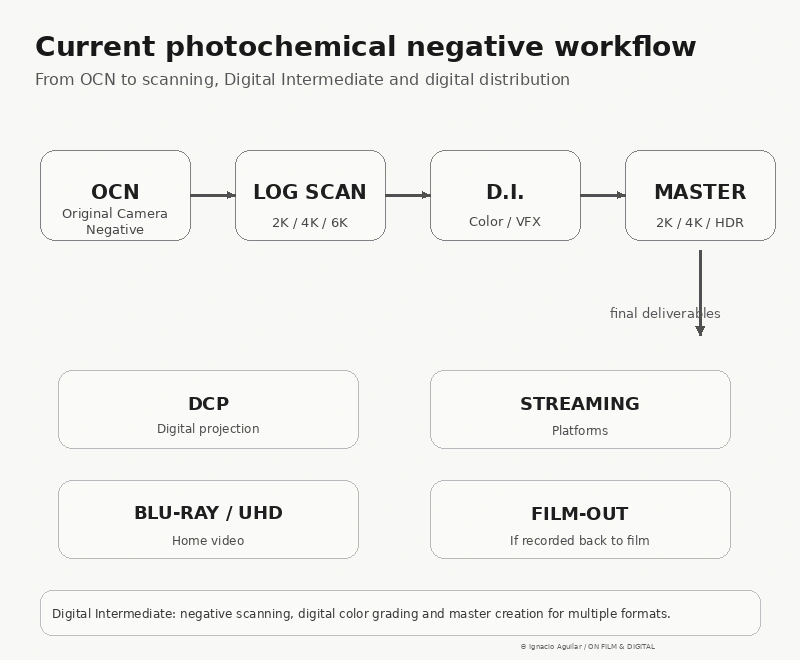
Once a negative has been exposed and processed, the photochemical image enters a different chain from the one that defined classical release printing: scanning, LOG files, dailies, offline editing, conforming, Digital Intermediate, digital mastering, preservation and, often, future restoration.
The previous part of this series dealt with the photochemical laboratory: latent image, normal processing, push processing, pull processing, printing, printer lights, original camera negative (OCN), interpositive (IP), internegative (IN), generational loss and special laboratory processes. That chain explains how an exposed negative became a visible image and, eventually, a positive exhibition print.
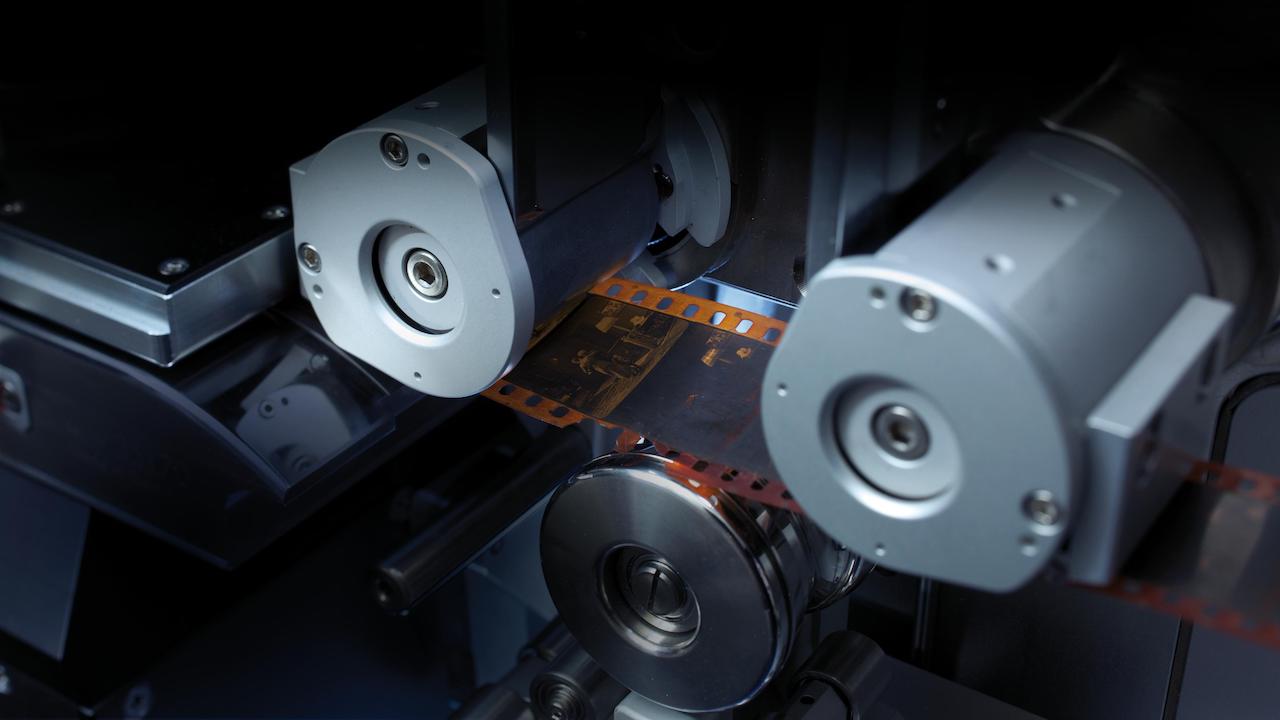
The contemporary workflow, standardized during the 2000s, no longer tends to end in a photochemical release print. Even when a film is shot on 16mm, Super 16mm, 35mm or 65mm, the negative is usually processed according to production instructions, inspected, cleaned and scanned so the image can be finished in a digital environment.
The negative remains the source. But finishing now shifts toward the Digital Intermediate —DI—, the DCP, streaming masters, Blu-ray, UHD, preservation elements or restoration. Once digitized, a film-negative workflow can become operationally close to a digital workflow. The difference lies in the origin of the image, in its texture, in the working discipline it imposes and often in the result. Before the negative is scanned, however, a number of important decisions have already been made.
Series: The Motion Picture Negative
Complete series hub: Guide to the Motion Picture Negative.
- Part I: The Motion-Picture Camera, Film Stock and Color
- Part II: Format, Film Speed, Film Stocks and Grain
- Part III: Exposure, Light Metering, Density and Latitude
- Part IV: Processing, Printing and Laboratory Processes
- Part V: scanning, Digital Intermediate, 4K restorations and the contemporary workflow
Shooting negative today: what has to be decided before production
Shooting on negative today is not just a matter of choosing a 16mm or 35mm camera and loading a film stock. Before production starts, the cinematographer and the production team must decide format, stock, available footage, shooting ratio, magazine size, laboratory, process, scanning type, scan resolution, deliverable files, dailies, offline workflow, color grade, final master and archive. Until the negative is digitized, the photochemical chain is physical and less reversible than a digital one. Many decisions therefore have to be made before the first foot of film is exposed.
The main difference from a digital workflow is not only the recording medium. In digital capture, many decisions can be shifted into RAW, LOG, the LUT or the final grade. In photochemical capture, part of the image is fixed by a material chain: stock, exposure, chemical processing, scanning or printing, and then postproduction. There is room to maneuver, but it is not infinite, and it does not behave in the same way.
| Decision | What it implies | Why it matters |
|---|---|---|
| Format | Super 16, 35mm 2-perf, 3-perf, 4-perf or larger formats. | Defines texture, film consumption, lenses, aspect-ratio strategy and useful scan resolution. |
| Film stock | VISION3 50D, 200T, 250D, 500T, KODAK VERITA 200D on request, black-and-white stocks or other available options. | Affects speed, grain, color, contrast, filtration and the real amount of light required. |
| Shooting ratio | The relationship between minutes shot and final running time. | Controls stock purchase, processing, scanning, drives, archive and shooting discipline. |
| Laboratory | Reception, processing, cleaning, preparation, scanning, dailies and archive. | The laboratory is not just a vendor. It is part of the technical design of the image. |
| File type | DPX LOG, EXR, ProRes 4444, ProRes 4444 XQ, ProRes 422HQ, H.264 or proxies. | Affects quality, data weight, cost, conforming and color management. |
| Preserved elements | OCN, LOG scans, master files, LUTs, XML, EDL, AAF and color project. | Makes later versions, revisions, restorations and future masters possible. |
Recommendation
Keep the number of variables under control. If a project does not really need several stocks, formats or laboratory processes, multiplying them out of fetishism usually complicates the workflow more than it improves the image. Many contemporary film shoots prefer to work with one main stock, often 500T, and control the result through exposure, filtration, lighting and DI. The point is not merely to shoot on negative. The point is to design a coherent chain from exposure to final master.
Before shooting: tests, not assumptions
One of the most valuable habits to recover from photochemical practice is that negative film is tested before production. It is not enough to know a stock in theory. It has to be seen through a specific camera, a specific set of lenses, a specific exposure, a specific laboratory, a specific scanner, a working LUT and a color-correction path. In other words, the complete workflow should be tested.
Tests should not be limited to checking whether there is “an image.” They should answer specific questions: how the stock renders skin, shadows and highlights; how much grain is acceptable in the chosen format; what happens when the negative is exposed one third, two thirds or one stop over or under; what push or pull processing does to the image; how the scanner translates that density; and how much real room the colorist has in the DI. In digital capture, we can often see a monitor image that is relatively close to the intended result. With film, that advantage disappears. We can look through the viewfinder and, at most, through an HD video assist that does not represent the image being recorded by the negative.
In a contemporary workflow, those tests should end in the same kind of material the team will use in postproduction: LOG scan, dailies, viewing LUT, base correction and, if possible, a short master test. The camera test no longer ends at the laboratory. It ends when the cinematographer sees how that stock travels through the whole chain to the final image.
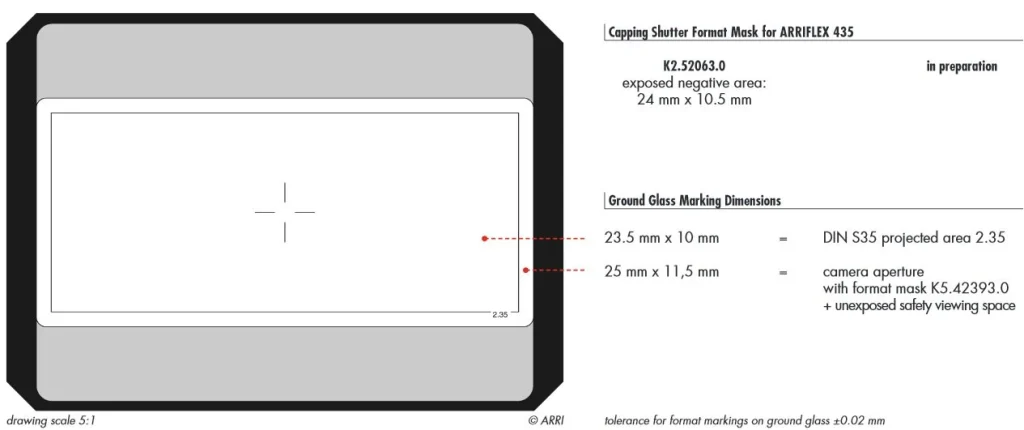
It is also worth performing registration and steadiness tests, to confirm that the camera holds the negative stable, and ground glass, aperture and framing tests, to verify that the viewfinder markings match the exposed area and the final scanned area. Douglas C. Hart’s The Camera Assistant: A Complete Professional Handbook remains one of the essential technical references for these procedures.
Recommendation
If the budget only allows for a short test, I would at least test skin, a low-light scene, a critical highlight, a gray/color chart and a contrast situation close to the actual film. And I would test them with the laboratory and scan workflow that will be used for the production.
From laboratory to digital master
Part IV treated the laboratory as the place where the photochemical image is transformed. This fifth part starts from a different point: the laboratory as the stage that prepares the negative for a digital master. The negative is processed, stabilized, cleaned, prepared and scanned. From that moment on, the image no longer exists only as a material chain. It also exists as a file.
That does not make the laboratory less important. The opposite is true. A negative that is poorly handled, poorly identified, poorly processed or poorly prepared will arrive at the scanner with problems that postproduction must correct, hide or accept. Digital post offers very flexible tools, but it does not automatically turn a weak source into a rich one.
What changes when the negative is scanned
Scanning a negative is not simply “making it digital.” The scanner interprets density, color, film base, stability, grain, dirt, scratches, splices, perforations and tonal range. The result is neither a photochemical positive print nor a direct photograph of the negative. It is a digital translation of a photochemical source.
For that reason, scan resolution should not be understood in a simplistic way. A 4K scan does not turn Super 16mm into 35mm, just as a 6K scan of 35mm does not automatically produce a better image than an excellent 4K scan. The stock, exposure, processing, lenses, negative contrast, cleanliness and scanner behavior are just as important. Resolution matters, but so do scanner optics, mechanical stability, captured dynamic range, bit depth, file format and downstream color management.
Grain is a good example. In a poor transfer it can become noise, a nervous mass or an unresolved texture. In a good scan, the grain maintains a more precise relationship with stock, format, exposure and enlargement. The point is not to erase grain. The point is to record it coherently within the image that contains it.
Scanning should not be decided by the number alone: 2K, 4K, 6K and so on. It should be chosen according to format, final destination, VFX, restoration, reframing, archive, budget and the desired behavior of grain.
Telecine, scanning and Digital Intermediate (DI)
For decades, telecine was the standard way of transferring film to video. It allowed photochemical material to be viewed, edited and broadcast in an electronic environment, but its logic belonged to television, video and signal standards. Contemporary scanning is different. It is designed to turn the negative into a digital working source, with higher resolution, finer tonal precision and more room for postproduction.
In a hybrid workflow, the negative is processed, scanned and converted into files. Those files may be DPX, EXR, ProRes 4444, ProRes 4444 XQ or other formats, depending on the laboratory, the budget and the final destination. From there, the production generates dailies, proxies and working files for editing, conforming and color grading.
The Digital Intermediate allows contrast, color, saturation, perceived density, curves, windows, masks, skin tones, skies, shadows and highlights to be adjusted with a precision that was impossible with photochemical printer lights. It also allows visual effects, stabilization, digital cleanup, selective grain reduction, compositing and multiple deliverables for theatrical release, streaming, HDR, SDR and archive.
Historical note
O Brother, Where Art Thou? (2000) is often cited as one of the key milestones in applying Digital Intermediate color correction to an entire Hollywood feature. After that, films such as Amélie (2001), Cidade de Deus (2002), Kill Bill (2003), Pirates of the Caribbean: The Curse of the Black Pearl (2003) and Seabiscuit (2003) helped normalize the process.
In its early years, DI was expensive and most commonly finished at 2K. Spider-Man 2 (2004) is usually cited as an early 4K DI milestone in a major Hollywood production. By the mid-2000s, DI had moved from exceptional tool to standard practice across much of industrial filmmaking, although some directors and cinematographers continued to defend fully or partially photochemical workflows in particular projects. Munich (Steven Spielberg, 2005) and There Will Be Blood (Paul Thomas Anderson, 2007) are relevant examples. Christopher Nolan has continued to defend what is probably the closest thing contemporary industrial cinema has to an all-analog chain: photochemical timing and film-based release workflows, with 5-perf 70mm and 15-perf 70mm presentations that avoid a conventional full-picture Digital Intermediate. Visual-effects shots still pass through digital processes before being recorded back to film, so the chain is not literally digital-free.
That flexibility does not make the negative less important. A well-exposed negative, with enough density, clean shadows and carefully placed highlights, gives the scan a richer source. A thin, underexposed or poorly controlled negative may reach the DI with less real latitude, even if digital tools can conceal some of the damage.
The importance of LOG and the digital translation of the negative
When a negative is scanned for a digital workflow, the working logic partly resembles modern digital capture: the goal is not an immediately contrasty finished image, but the preservation of as much information as possible. That idea sits at the heart of Kodak’s VISION3 family: latitude, highlight control, cleaner shadows and the ability to move through a digital workflow without destroying the photochemical texture.
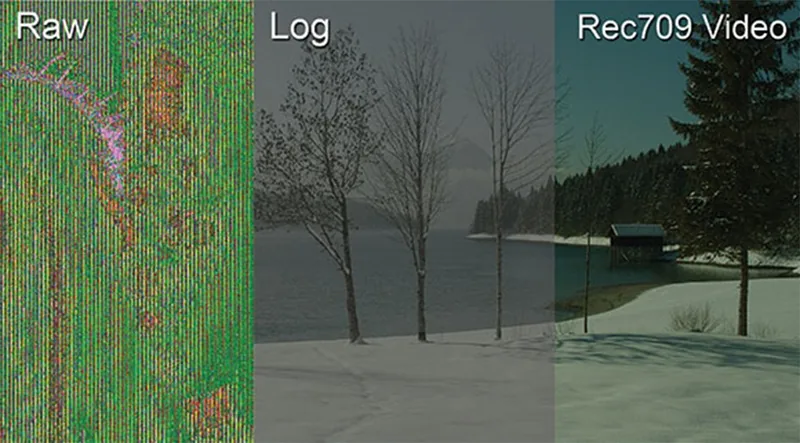
For that reason, a scan will often preserve a logarithmic, low-contrast image designed to hold shadow, midtone and highlight detail. This connects with contemporary LOG or RAW practice, but it should not be confused with it. A LOG scan of a negative is not a digital-camera RAW file. It is better understood as a working LOG file generated from an already processed photochemical source.
It is especially important that the scan be LOG —or, more precisely, that it preserve the negative’s density range in a high-bit-depth, non-display-referred representation. In practical cinematography terms, LOG remains the clearest and safest way to keep the dynamic range present in the negative available for grading. Traditionally, the exceptional handling of highlights has been one of the defining differences between motion-picture negative and digital acquisition.
Unlike RAW, which reaches postproduction as unprocessed sensor data, a scanned negative comes from a processed photochemical image, already carrying grain, density, contrast and color. Both a negative scan and a RAW file may need a transformation to be viewed correctly, but their technical origin is different. In the case of negative, exposure and processing are irreversible.
Practical contemporary workflow: shooting Super 16mm
A contemporary Super 16mm workflow is usually hybrid: photochemical capture, laboratory processing, digital scanning and DI finishing. The film is not normally finished as a photochemical positive print, but as a digital master for DCP, streaming, television, Blu-ray, UHD, archive or festivals.
Example Super 16mm workflow
Super 16 camera → 400 ft magazine → camera report → laboratory → ECN-2 normal / push / pull processing → cleaning and preparation → 2K or 4K LOG scan → DPX / ProRes 4444 / ProRes 4444 XQ → dailies and proxies → offline edit → conform → DI → final master → DCP / ProRes master / streaming / archive.
In Super 16mm, a 400 ft roll —121.92 meters, usually rounded to 122 m— runs for approximately 11 minutes and 6 seconds at 24 fps. That allows relatively long takes and lighter logistics than 35mm, but the format requires more attention to grain, exposure and scanning. A 2K scan may be enough for many finishes; a 4K scan can be useful for preserving grain structure more accurately, allowing moderate reframing, archiving or integrating the material into contemporary post workflows.
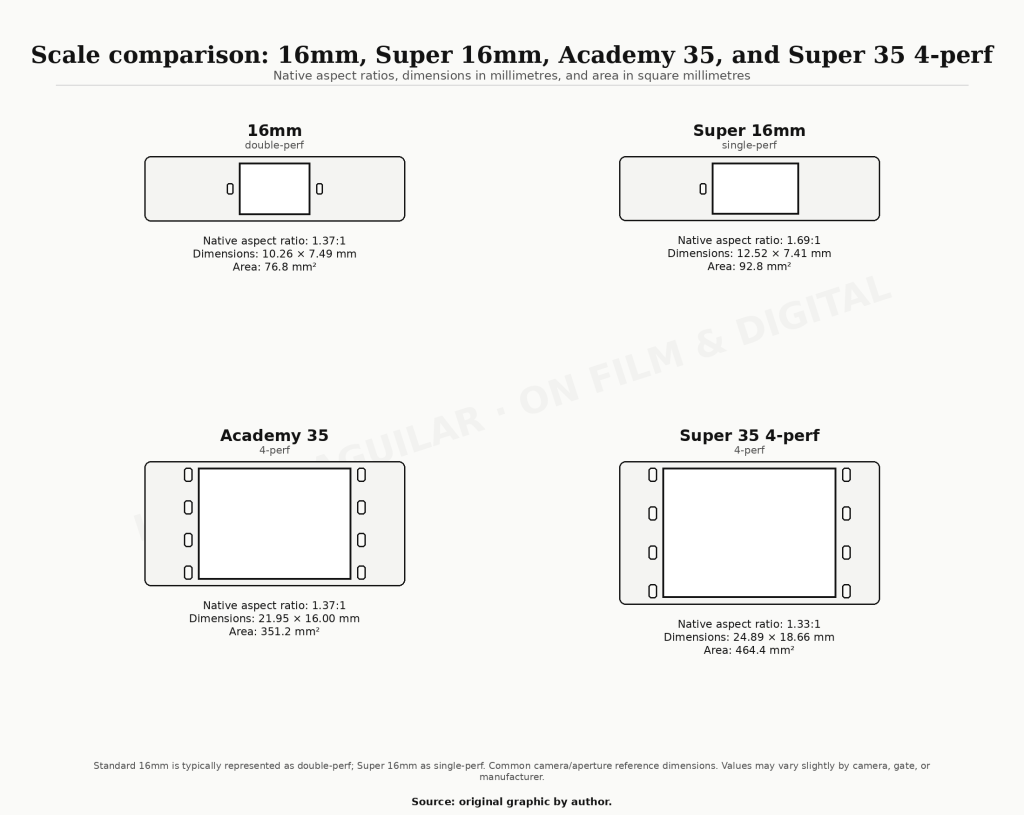
Super 16mm has a small negative. It can therefore carry a lot of grain. If the aim is to obtain a photochemical image closer to 35mm, my personal recommendation, when possible, would be to use Kodak 7203 (50D) in strong daylight situations, especially exteriors. If there is enough lighting but the situations vary, I prefer Kodak 7213 (200T), balanced for tungsten and usable at 125 EI in daylight with an 85B filter. Kodak 7219 (500T), the fastest stock, can be an excellent all-purpose option, but it is also the stock where overexposing by one third, two thirds or one stop is most advisable if the light level and visual intention allow it. Can it be used at 500? Of course. But the grain will be much stronger than in 35mm.
Personal criterion
In Super 16mm, if the intention is not for grain to dominate the image, exposure, lenses and stock choice need particular care. Zeiss Ultra 16 lenses, for instance, remain one of the best optical options for extracting sharpness and contrast from a small negative. It is also worth remembering that Super 16mm has greater depth of field than 35mm. That means these lenses can be used quite wide open —around T/1.8 to T/2.0— while still retaining a reasonable depth of field, roughly comparable to T/3.5–T/4.0 in 35mm. In any case, 4K does not turn Super 16mm into 35mm. Its value is in recording the negative texture, grain edge, stability, dirt, real focus and available information for the DI with greater precision.
Practical contemporary workflow: shooting 35mm
In 35mm, the workflow is similar, but there is more negative area, less relative grain and a stronger argument for 4K or higher scans. The first decision is whether to shoot Academy 35, which does not use the full width of the 35mm negative because it preserves lateral space for the soundtrack in the photochemical release process, or Super 35, which may be 2-perf, 3-perf or 4-perf.
If the final aspect ratio is 2.35:1 or similar, 2-perf can make considerable sense. 3-perf is ideal for 16:9 or 1.85:1, although it can also be composed for 2.35:1 or similar. 4-perf is natively 4:3; it can be composed for any aspect ratio, but the wider the extraction, the more negative area is discarded.
In a hybrid photochemical-digital workflow, Super 35 usually makes a lot of sense, except in traditional 35mm 4-perf anamorphic production with 2x lenses, which normally uses the Academy aperture area.
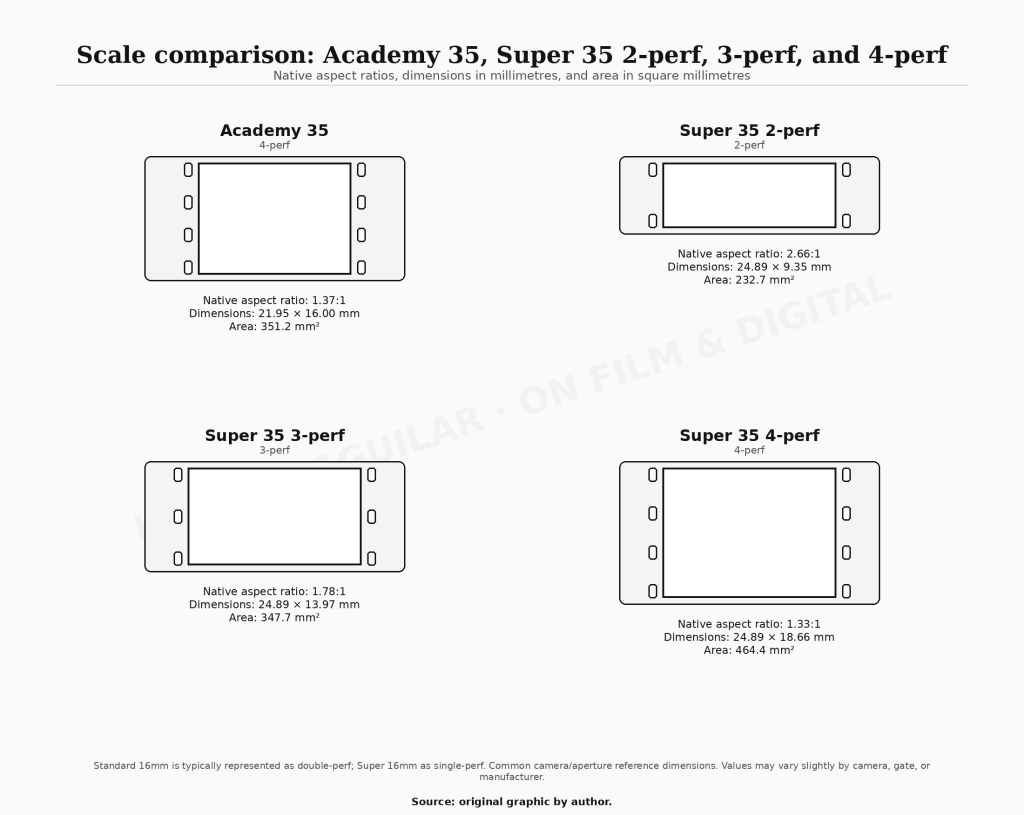
The choice between 2-perf, 3-perf and 4-perf directly affects film consumption, aspect ratio, negative area, processing and scanning cost, and the type of finish that makes sense. Reducing perforations saves film: 3-perf uses roughly 25% less negative than 4-perf, and 2-perf roughly 50% less. Most cameras are 4-perf, some are 3-perf, and some can be converted. 2-perf is much harder to find. Sean Bobbitt, BSC shot films such as Hunger, Shame and 12 Years a Slave in Super 35 2-perf, but it remains an exception.
Example 35mm workflow
35mm 2-perf / 3-perf / 4-perf camera → 400 ft / 122 m or 1000 ft / 305 m magazine → camera report → laboratory → ECN-2 normal / push / pull processing → cleaning and preparation → 4K / 6K / 6.5K LOG scan → DPX / ProRes 4444 / ProRes 4444 XQ → dailies and proxies → offline edit → conform → 2K or 4K DI → final master → DCP / HDR-SDR / ProRes master / archive.
In 35mm 4-perf at 24 fps, a 400 ft roll runs for approximately 4 minutes and 26 seconds. A 1000 ft roll runs for approximately 11 minutes and 6 seconds. In other words, a 400 ft magazine in 35mm 4-perf does not provide the same practical running time as 16mm. It lasts less than half as long.
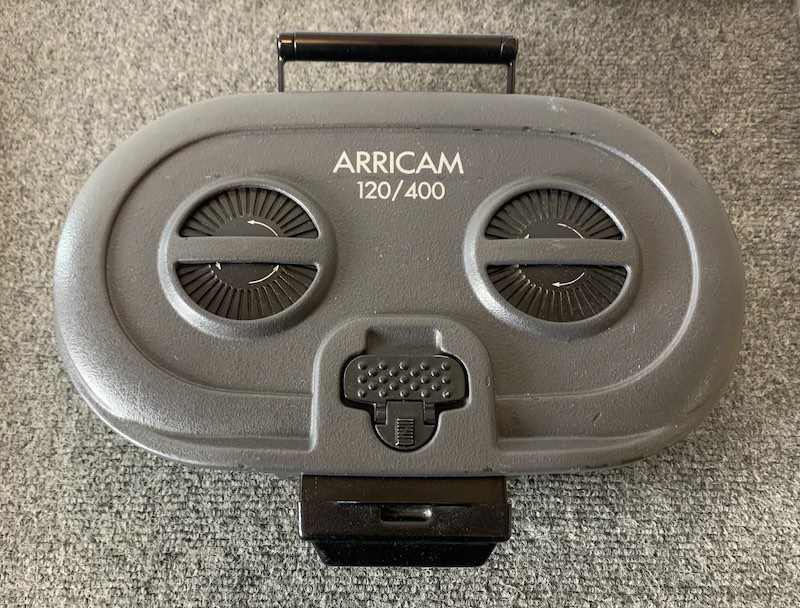
In 35mm, 4K is usually a reasonable balance for a contemporary finish. Higher scans can make sense for archive, restoration, VFX, stabilization, reframing or maximum preservation of the negative, but not every project needs that level of data. Scan resolution should be decided according to the actual format, aspect ratio, budget, final destination and the amount of postproduction margin required.
Practical idea
I would be especially careful with 500T in Super 16mm if the intention is not for grain to dominate the result. In 35mm, the same stock can function as a main stock with much more freedom. VISION3 is clean and relatively fine-grained, but it still carries more texture than a digital image when that distinction is desired.
Approximate cost: footage, raw stock, processing and scanning
The real cost of a photochemical shoot depends on country, supplier, laboratory, discounts, shipping, insurance, stock availability, processing, scanning, dailies, archive, camera rental, lenses and crew. For that reason, it is not useful to publish one number as if it were a universal rate. The responsible approach is to work with orders of magnitude, separate cost items and request updated quotes before closing the budget.
At the time of writing, the most solid reference for raw stock in Europe is the KODAK Motion Picture Products Price Catalogue for Europe, effective April 10, 2026. Kodak explicitly states that prices may change without prior notice, that they do not constitute a firm offer of sale and that prices must be confirmed before placing an order. Prices are listed excluding VAT.
| Format | Load / approximate running time | Kodak Europe 2026 net price | Notes |
|---|---|---|---|
| 16mm / Super 16mm VISION3 | 100 ft / 30.5 m / approx. 2 min 46 sec | €64 | 50D, 200T, 250D or 500T in an equivalent load. |
| 16mm / Super 16mm VISION3 | 400 ft / 122 m / approx. 11 min 06 sec | €223 | Common load for 16mm / Super 16mm magazines. |
| 35mm 4-perf VISION3 | 400 ft / 122 m / approx. 4 min 26 sec | €365 | 35mm BH perforation, according to the Kodak catalogue. |
| 35mm 4-perf VISION3 | 1000 ft / 305 m / approx. 11 min 06 sec | €911 | Common load in professional 35mm production. |
As a consumption reference, at 24 fps, 16mm uses approximately 36 feet per minute, while 35mm 4-perf uses approximately 90 feet per minute. Consumption drops significantly in 35mm 3-perf or 2-perf. That is why those formats have historically been attractive for productions that wanted part of the character of 35mm at a lower cost than 4-perf.
| Project | Final running time | Footage shot | Approx. Super 16 | 16mm stock cost | Approx. 35mm 4-perf | 35mm stock cost |
|---|---|---|---|---|---|---|
| Short film | 10 min | 50 min | 1,800 ft / practical purchase: 5 × 400 ft | €1,115 | 4,500 ft / practical purchase: 5 × 1000 ft | €4,555 |
| Feature film | 100 min | 500 min | 18,000 ft / practical purchase: 45 × 400 ft | €10,035 | 45,000 ft / practical purchase: 45 × 1000 ft | €40,995 |
Laboratory and scanning costs vary more widely. Some laboratories publish general rates; others work mostly by custom quote. The services page of Andec Filmtechnik in Berlin is a useful public European reference because it separates processing, scan preparation, push/pull and 16/35mm scanning. In its published rates, 16mm color processing with scan preparation is listed at €1.30/m, 35mm color processing with scan preparation also at €1.30/m, and push/pull adds €0.50/m per stop. For 16/35mm scanning, Andec lists a 4K base price of €350 including 10 minutes, plus €25 per additional minute; for 4K 16-bit DPX, €350 base and €27.50 per additional minute.
| Item | Published reference | Note |
|---|---|---|
| 16mm color processing with scan preparation | €1.30/m | Net price published by Andec for processing + scan preparation. |
| 35mm color processing with scan preparation | €1.30/m | Net price published by Andec for processing + scan preparation. |
| Push / pull | +€0.50/m per stop | Process variation surcharge, according to published rates. |
| 16/35mm 4K scan | €350 base, 10 min included; +€25/additional min | Andec lists DFT Scanity as standard; ARRISCAN XT on request and with possible additional costs. |
| 16/35mm 4K 16-bit DPX scan | €350 base, 10 min included; +€27.50/additional min | Heavier data option, more oriented toward archive, restoration or demanding DI work. |
Andec also indicates that, unless otherwise specified, its 16/35mm scans are made at 25 frames per second and delivered as ProRes 422HQ by link. For film projects shot at 24 fps, scan speed and delivery frame rate should be specified explicitly to avoid errors in duration, sync or conforming.
| Example TOTAL NEGATIVE + LAB COST PER PROJECT (camera equipment not included) | Footage shot | Kodak stock | Processing + scan prep | 4K scan | Approx. net total |
|---|---|---|---|---|---|
| 10 min short film, 5:1 ratio, Super 16mm | 50 min / 1,800 ft / 549 m | 5 × 400 ft = €1,115 | 548.6 m × €1.30 = €713 | €350 + 40 min × €25 = €1,350 | €3,178 |
| 10 min short film, 5:1 ratio, 35mm 4-perf | 50 min / 4,500 ft / 1,372 m | 5 × 1000 ft = €4,555 | 1,371.6 m × €1.30 = €1,783 | €350 + 40 min × €25 = €1,350 | €7,688 |
| 100 min feature film, 5:1 ratio, Super 16mm | 500 min / 18,000 ft / 5,486 m | 45 × 400 ft = €10,035 | 5,486 m × €1.30 = €7,132 | €350 + 490 min × €25 = €12,600 | €29,767 |
| 100 min feature film, 5:1 ratio, 35mm 4-perf | 500 min / 45,000 ft / 13,716 m | 45 × 1000 ft = €40,995 | 13,716 m × €1.30 = €17,831 | €350 + 490 min × €25 = €12,600 | €71,426 |
As a public reference outside Europe, Negativeland in New York publishes 16mm rates that combine processing and scanning: $0.55/ft for color negative or black-and-white reversal with processing + 2K scan, and $0.75/ft for processing + 4K scan. It is useful for seeing how other laboratories package processing and scanning by the foot, but it should not be applied automatically to a European production.
As a real production reference, European laboratory rates in October 2023 included color-processing setup fees and per-meter pricing, along with HD, 2K and 4K dailies priced by the minute. In that specific case, color processing varied by volume —under 122 m, between 122 and 488 m, and over 488 m— and dailies were budgeted per minute. It is useful as a cost-structure reference, but it is not a current universal rate.
| Item | Indicative reference | Note |
|---|---|---|
| Color processing < 122 m | €175 setup + €1.15/m | The fixed cost weighs heavily on tests or very short footage. |
| Color processing 122–488 m | €75 setup + €1.00/m | Intermediate tier for small or partial shoots. |
| Color processing > 488 m | €0.70/m | Volume can reduce the per-meter cost. |
| HD / 2K / 4K dailies | €8 / €15 / €42 per min | Viewing and delivery resolution can significantly change the cost. |
The practical reading matters more than the exact figure. Laboratory cost does not grow only by meters of negative. It also grows through processor setup, dailies resolution, delivered volume, urgency, handling, storage, data upload and deliverables. A short film with very little footage can carry a proportionally high cost if it requires a laboratory chain to be started for only a few meters.
Practical idea
A photochemical budget should separate raw stock, processing, scanning, dailies, drives, shipping, insurance, tests, archive and DI. If everything appears as a single generic “film” line, the budget is not controlled enough.
Dailies, workprints, trims, short ends and traceability
In a contemporary photochemical shoot, it is useful to distinguish between a workprint, raw scan files and dailies. The workprint belonged to the classical photochemical workflow: a positive print used to view the processed material. Digital raw material comes from the scan or from a working transfer. Dailies are the viewable files the team receives to check exposure, focus, continuity, performance and technical issues.
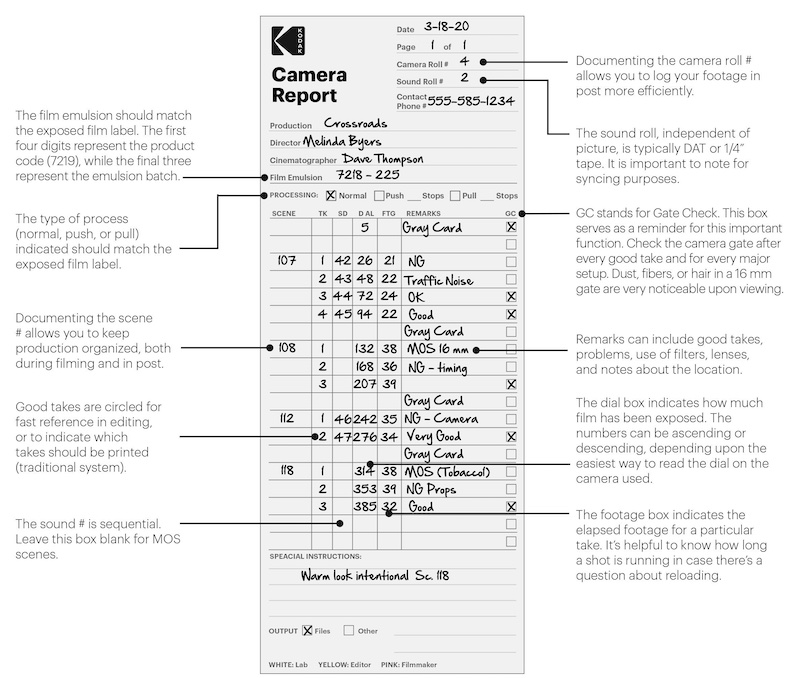
Terminology can vary by country, laboratory and production, but the need is the same: each physical roll must remain connected to its digital files. Roll number, stock, footage, camera, magazine, laboratory process, keycode, timecode, clip, LUT and notes must remain traceable all the way to conforming. If that relationship is lost, editing may continue, but the DI can become an uncertain reconstruction.
Trims, partial rolls, recans and short ends are not minor details. They affect inventory, consumption, continuity, identification and laboratory communication. A badly labeled roll can generate processing, scanning or conforming errors. A can with unclear information forces people to guess. In digital, the error is often metadata. In photochemical work, it can also be physical.
Practical idea
With negative, part of postproduction begins in camera. A good camera report is not bureaucracy. It is the connection between physical film, laboratory, scanning, editing and DI.
Modern 4K restorations: opportunity and risk
Modern restoration of films shot on photochemical negative has opened an extraordinary possibility: returning to the Original Camera Negative or to the best surviving elements, scanning them at 4K or higher resolutions, stabilizing the image, repairing physical damage, recovering tonal information and creating new digital masters for theaters, Blu-ray, 4K UHD, television, platforms and archive.
When the work is done with judgment, a restoration can reveal a richness that damaged release prints, old telecines or video masters never showed clearly. Grain can become more defined, the texture of the negative more legible, colors more separated and highlights closer to the tonal scale the emulsion could actually carry.
But that same possibility contains a risk. The original negative does not automatically equal the final look of a film as it was released. In the classical photochemical workflow, color timing, printer lights, interpositive, internegative, print stock and projection conditions were part of the result. A digital restoration from the OCN may reveal more information, more sharpness or more latitude, but it may also move away from the contrast, density, color or print texture that historically defined the viewing experience.
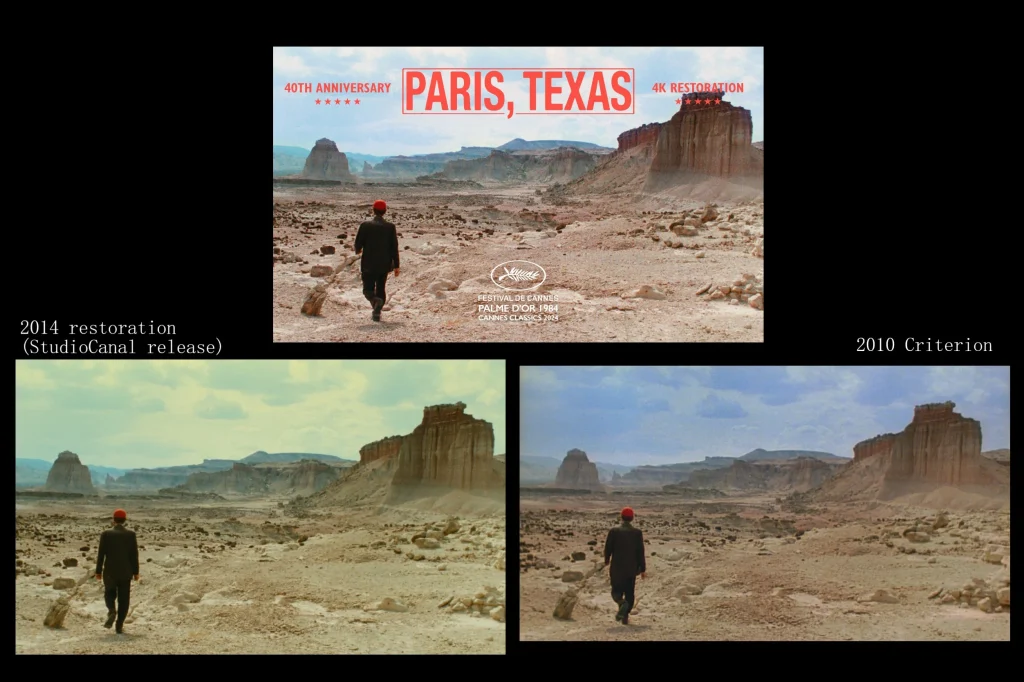
Ideally, a restoration project should access the OCN and scan it at 4K —or at a higher resolution if the format and budget justify it— with the greatest practical color depth. But the subsequent digital grade must respect the original photochemical timing. That requires a later reference element in good condition: an interpositive (IP), projection prints, color-timing documentation, laboratory notes or qualified supervision. The negative is not timed. One has to know how it looked after the photochemical adjustments were applied.
Directly scanning an interpositive may also be a valid option. The advantage is that the element already contains part of those photochemical adjustments. The disadvantage is that it belongs to a later generation, so its potential quality may be lower. There is no universal answer. Some restorations should return to the OCN; others need several elements to be compared so that richness of information is not confused with historical fidelity.
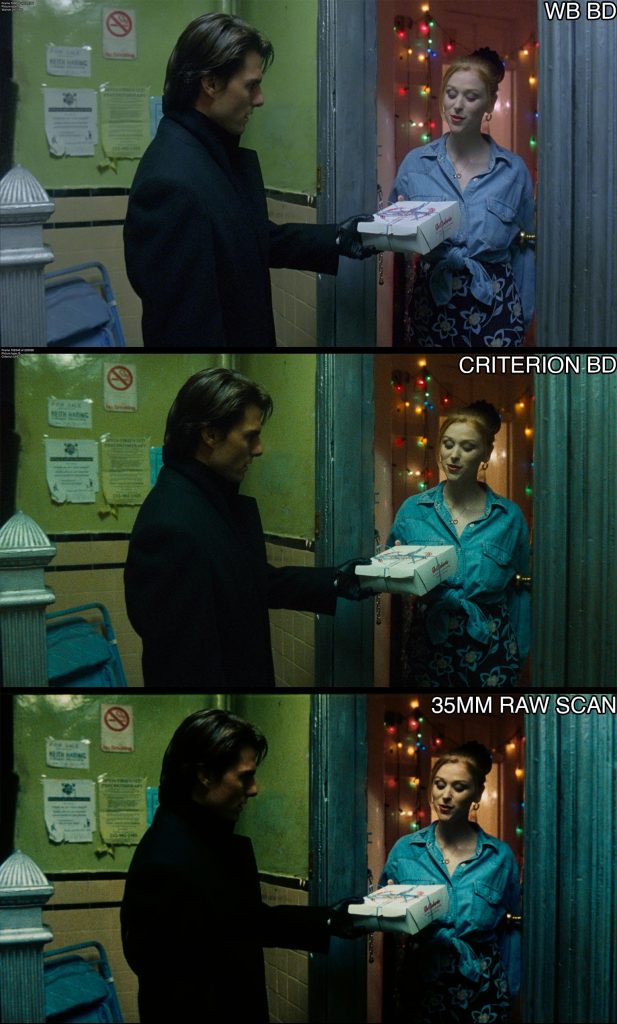
The risk of going to the OCN without references is clear: a film can end up brighter, darker, bluer, greener, warmer, cleaner or more modern than it originally was. We have seen restorations and new digital masters where, even with supervision from filmmakers or cinematographers, the result moves away from the release look, either because of a new aesthetic interpretation or because digital tools allow changes that photochemical timing could not. Digital Noise Reduction —DNR— is one obvious example, used to remove or soften grain; more recently, AI tools have also been used to increase perceived sharpness. That is the central problem. Restoration is not only about recovering information. It is about deciding which information best represents the film.
Classical photochemical workflow vs hybrid workflow
The essential difference between these workflows is not only the final tool, but the distribution of decisions. In the classical photochemical workflow, camera, stock, laboratory and positive print formed a material unit. In a hybrid workflow, camera and negative remain photochemical, but finishing moves into a digital environment. This is now overwhelmingly the dominant process, and it allows 16mm, 35mm and larger-format productions to combine two worlds: the organic structure of the photochemical image and the flexibility of digital finishing, while preserving much of the quality of the original negative.
| Aspect | Classical photochemical | Hybrid / DI workflow |
|---|---|---|
| Source | Processed negative, intermediate elements and print. | Processed negative scanned as digital files. |
| Correction | Printer lights, color timing and answer print. | Digital grading, curves, windows, masks, LUTs and color management. |
| Distribution | Interpositives, internegatives and exhibition prints. | DCP, digital master, streaming, Blu-ray, HDR, SDR and archive. |
| Visual character | Material chain with print texture and generational loss. | Greater local and global control, with the possibility of preserving or transforming photochemical texture. |
Key points
- Shooting on negative today usually means a hybrid workflow: photochemical capture, processing, scanning and digital finishing.
- Scanning is not neutral: it interprets density, color, grain, stability, dirt and tonal range.
- Digital Intermediate allows a level of control that classical photochemical printing could not offer, but it does not replace good exposure.
- LOG is not the final image. It is a wide working representation for later correction.
- A negative scanned in LOG is not digital RAW. Its origin is physical, chemical and material.
- Super 16mm and 35mm require different criteria for exposure, grain, scan resolution and budget.
- Costs should be budgeted by item: raw stock, processing, scanning, dailies, drives, shipping, tests, archive and DI.
- Traceability between physical roll and digital file is essential for editing, conforming, DI and restoration.
- A 4K restoration must respect the relationship between negative, laboratory, print and original style.
- The negative remains relevant not only because of grain, but because of the chain of decisions it imposes.
Closing the series
Across this series, we have followed the negative from its physical base to its contemporary finish: camera, stock, color, format, film speed, exposure, density, latitude, processing, printing, scanning, Digital Intermediate, archive and restoration. For many of us, the photochemical image has more character, more organic behavior and a more living texture than digital cinema. That may be true. But it requires discipline and a workflow that must be respected. When the budget, schedule and production will are there, it remains —even within today’s hybrid workflow— an absolutely magical process, one that still brings us back to the essence of cinematography.
Read the complete series
Complete hub: Guide to the Motion Picture Negative.
This final part closes the series by following the processed negative into LOG scanning, dailies, conforming, DI, mastering, archive and restoration.
Sources and related reading
- KODAK Motion Picture Products Price Catalogue for Europe, effective April 10, 2026. Primary reference for Kodak raw-stock catalogue prices in Europe.
- Kodak Motion Picture. Technical documentation on stocks, formats, motion-picture products and laboratories.
- Kodak Motion Picture Film Labs. General reference for laboratories, processing services, scanning and handling of photochemical material.
- Andec Filmtechnik. Public rates for processing, scan preparation, push/pull and 16/35mm scanning, used here to establish European orders of magnitude.
- Negativeland 16mm Processing & Scanning. Public US reference for combined 16mm processing and scanning rates.
- Douglas C. Hart, The Camera Assistant: A Complete Professional Handbook. Professional reference on camera preparation, testing, magazines, camera reports, loading, short ends, traceability and camera-department methodology in photochemical shoots.
- American Cinematographer Manual. Technical reference on exposure, laboratory work, printing, photochemical workflows, scanning and postproduction.
- American Cinematographer. Articles and interviews on negative film, Digital Intermediate, restorations, scanning and photochemical preservation.
- John Belton, “Painting by the Numbers: The Digital Intermediate,” Film Quarterly, Spring 2008. Historical reference on the consolidation of DI.
- Cinelab, FotoKem, Kodak Film Lab Atlanta and other contemporary laboratories. Practical references on processing, scanning, dailies, archive and hybrid workflows.
- Indicative European laboratory rates communicated in October 2023 for 16mm/35mm color processing and HD, 2K and 4K dailies. Always verify before budgeting.
- Author’s own teaching materials on motion-picture negative, exposure, laboratory processes, scanning, DI, archive and restoration.
ON FILM & DIGITAL
© Ignacio Aguilar, 2026.