The Motion Picture Negative (III): Exposure, Light Metering, Density and Latitude
ON FILM & DIGITAL · Technical article
The Motion Picture Negative
Part III: Exposure, Light Metering, Density and Latitude
By Ignacio Aguilar, AEC, cinematographer
Spanish original: El Negativo Cinematográfico (III): exposición, fotometría, densidad y latitud
Once format, film speed and stock have been chosen, the motion-picture negative really begins to take shape through exposure: how much light it receives, how that light is measured, what density it builds, and how much room remains before the image becomes difficult to recover.
In the second part of this series, I looked at how format, negative area, ASA speed and film stock choice affect texture, definition and apparent grain. But no stock behaves in isolation. A negative does not simply “give” an image by itself. It has to be exposed.
To expose a negative is to choose an exposure time —determined by camera speed and shutter angle, for example approximately 1/48 s at 24 fps with a 180º shutter— and a lens aperture, normally expressed in T-stops, for example T/2.8. The film in the camera also has a manufacturer’s recommended speed, such as 500 ASA for a 500T stock. These three variables are connected. If one increases, at least one of the others must decrease to keep the same exposure. If one decreases, at least one of the others must increase. This is the familiar exposure triangle.

Exposure triangle: aperture, shutter and sensitivity. Source: No Film School.
Exposure is both a technical decision and an expressive one. A normal exposure should produce a negative with ordinary brightness placement and density. But the cinematographer may decide to underexpose or overexpose deliberately.
With negative film, the cinematographer decides whether to rate a stock at its nominal speed —for instance, measuring Kodak 500T at 500 ASA—, to treat it as a slower stock and give it more light —for instance, rating the same 500T at EI 250—, or to treat it as a faster stock and give it less exposure —for instance, EI 1000. Moving away from the manufacturer’s recommendation usually comes from two related intentions:
- To adapt the stock to production conditions. There may be too little light, so the stock is used as if it were faster than it really is. Or there may be a faster stock in the camera than the scene actually needs. In both cases the meter can be set to a different speed from the manufacturer’s recommendation, and each decision will produce a different negative.
- To alter the visual character of the stock. Treating a film as faster or slower changes density, grain, shadow quality and the way the image responds later in printing, scanning or grading. Used at the manufacturer’s recommended speed, the stock will tend toward its expected behavior under normal conditions.
This is where a film stock stops being a purely industrial product and becomes a photographic interpretation. Two cinematographers can use the same Kodak VISION3 500T, the same format and the same laboratory, and still obtain very different images if their exposure criteria are not the same.
Series: The Motion Picture Negative
- Part I: the motion-picture camera, film stock and color
- Part II: format, film speed, film stocks and grain
- Part III: exposure, light metering, density and latitude
- Part IV: processing, printing, Digital Intermediate and special laboratory processes
Exposing the negative: a decision, not an automatic reading
The motion-picture negative records light photochemically. The lens projects an image onto the emulsion, the shutter determines how long each frame is exposed, and the lens aperture —in cinema, marked in T-stops— controls how much light passes through the optics. The speed of the stock indicates how much light it should need, in principle, to produce what the manufacturer considers a normal exposure.
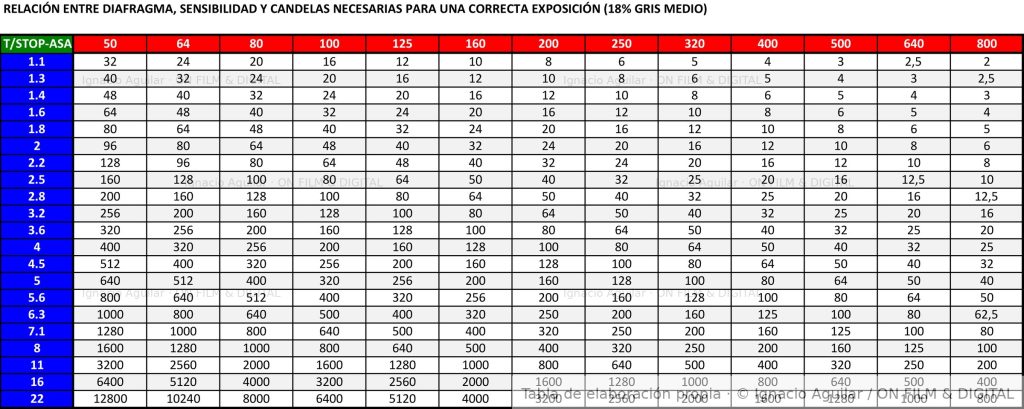
What is a footcandle?
In Spanish film-production practice, the word candela has often been used as an operational translation of footcandle, especially when working with light meters and exposure tables. In this article, it is used in that professional sense: as a practical reference for the amount of light reaching a surface.
Strictly speaking, the photometric equivalent of the footcandle as a unit of illuminance is the lux: 1 footcandle is approximately 10.76 lux. Therefore, when this text refers to candelas/footcandles, it should be understood as common production usage, not as a metrological definition of the SI candela.
Practical exposure examples with a 500T stock
The following table summarizes several practical exposure examples using a 500T stock, 24 fps, a 180º shutter and a base reading of T/2.8. The numbers are approximate, but they help clarify how required light level, aperture and negative density change when the working EI is changed.
| Working criterion | Meter setting | Approximate light needed | What we are doing | Effect on the negative |
|---|---|---|---|---|
| Nominal reference | 500 ASA at T/2.8 | 20 footcandles | We expose the 500T according to the manufacturer’s recommendation. | Normal density, grain and contrast for the stock. |
| +1 stop overexposure | EI 250 at T/2.8 | 40 footcandles | We treat the 500T as if it were slower and give it more light. | Denser negative, cleaner shadows, less apparent grain and more solid blacks. |
| -1 stop underexposure | EI 1000 at T/2.8 | 10 footcandles | We treat the 500T as if it were faster and use less light. | Thinner negative, more apparent grain and more fragile shadows. |
| Very low available light | EI 1000 at T/2.0 | 5 footcandles | We raise the EI and open the lens to work at a very low light level. | A usable low-light image, but with less density and more shadow risk. |
| Same light, more depth of field | EI 1000 at T/4 | 20 footcandles | We keep a light level close to the nominal reference, but stop down. | We gain depth of field, but the negative receives one stop less exposure. |
Author’s own reference table by Ignacio Aguilar / ON FILM & DIGITAL. The values refer to a 500T stock, 24 fps and a 180º shutter, and may vary depending on meter calibration, lens transmission, laboratory practice and exposure criteria.
As the table shows, the same film stock can be handled in very different ways. Rating 500T at EI 250 gives it more light and produces a denser negative. Rating it at EI 1000 gives it less light and accepts a thinner negative. The decision affects more than final brightness. It affects texture, grain, possible depth of field and the strength of the shadows.
Practical idea
Changing the EI on the light meter does not physically change the stock. It changes how much light the negative will receive. For that reason, rating a 500T stock at EI 250 or EI 1000 is not a neutral numerical adjustment. It is a decision about density, texture and working margin.
A 500 ASA, T/2.8 reference is especially interesting to me because, when I use it —or any other combination that requires about 20 footcandles— the film often records something quite close to what my eyes perceive on the set. I find the same with digital cameras. It is a comfortable light level for working and for maintaining continuity.
In photochemical cinematography, the same scene can therefore be exposed according to different criteria without any of them being automatically wrong. The cinematographer may prefer a denser negative, with cleaner shadows and more controlled grain —what happens when we lower the ASA setting— or accept a thinner negative, with more visible grain, less solid blacks and a more fragile image —what usually happens when we raise the ASA setting.
Exposure, then, is not just a light calculation. It is a way of placing the image within the characteristic curve of the emulsion: deciding which parts of the scene fall into the shadows, where middle gray sits, how much room is left for highlights, and what general density the negative will have before it reaches the laboratory, print or scanner.
Nominal ASA, EI and exposure criteria
The nominal ASA of a film stock is the manufacturer’s recommended speed. If a stock is sold as 500T, the normal point of departure is to meter it at 500 ASA: enter that value into the meter, measure the light and set the corresponding stop for a standard exposure. The same logic applies to 50D, 200T, 250D and other stocks.
But the cinematographer may choose a different Exposure Index —EI— and treat the stock differently. In practice, this means telling the meter that the film is slower or faster than the manufacturer indicates. The emulsion does not physically change, but the amount of light we put on the set —or allow to reach the emulsion through the lens— does change.
If Kodak 500T is rated at 400, 320 or 250 ASA, the meter assumes the film needs more light. To compensate, it will lead us toward opening the lens or increasing the lighting. The result is approximately one third of a stop overexposure at 400, two thirds at 320, and one full stop at 250. The stock remains 500T, but it has received more exposure than nominal. It can of course be overexposed further if that stronger effect is desired.
If the same 500T is rated at 640, 800 or 1000 ASA, the opposite happens. The meter assumes the film is faster and needs less light. We will close the lens accordingly or light less. The result is underexposure of roughly one third of a stop at 640, two thirds at 800, and one stop at 1000 relative to nominal speed. It can also be underexposed further, with a stronger effect.
| Stock | EI used on the meter | Practical effect | Consequence for the negative |
|---|---|---|---|
| 500T | 500 ASA | Nominal exposure | Standard density according to the manufacturer’s recommendation |
| 500T | 250 ASA | +1 stop | Denser negative, cleaner shadows and less apparent grain |
| 500T | 1000 ASA | -1 stop | Thinner negative, more apparent grain and poorer shadows |
This should not yet be confused with push-processing or pull-processing. Here we are talking about exposure in camera: how much light the negative receives. The laboratory may process that negative normally or modify development, but that belongs to the next part of the series.
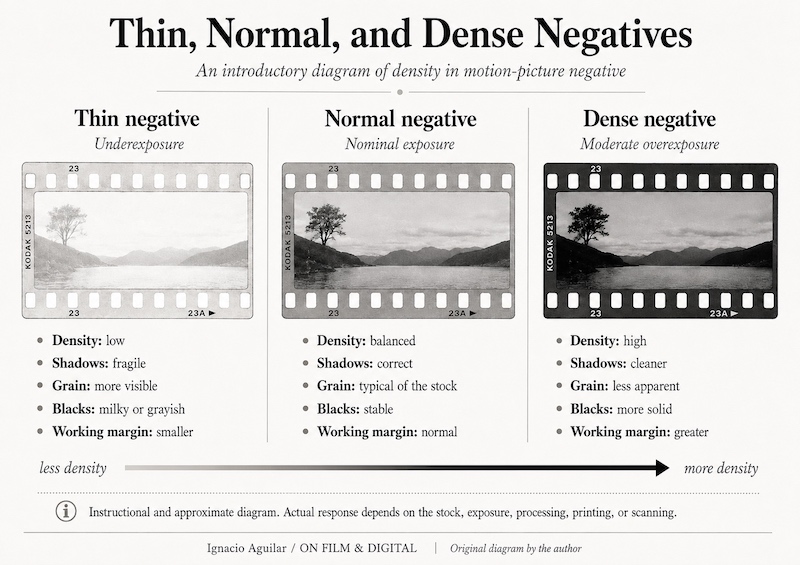
Density: how much image is really in the negative
In a negative, more light means more density. This can be counterintuitive if we think from a positive print or from a normalized digital image, but it is essential to photochemical exposure. Areas that receive more light build greater density after development. Areas that receive less light remain thinner.
A dense negative does not necessarily mean a brighter final print. It means that the material contains more photographic information in those areas. In a traditional photochemical workflow, that density could be compensated when printing by bringing the print down. In a contemporary workflow, it can be normalized during scanning and grading. But the starting point is not the same: a well-exposed, denser negative offers more working room than an underexposed negative.
Think of it this way. Conservatively, a modern VISION3 negative offers roughly +9 stops of highlight range and -5 stops in the shadows. If it is exposed as Kodak recommends, that is the range we should obtain under normal conditions. If we expose one stop over, we gain density and move middle gray higher on the curve. We may lose some highlight room, but we gain it in the shadows, where the negative has less margin. In that sense, gaining density means gaining information in the weak part of the stock. The practical distribution becomes closer to +8 and -6, and so on.
Approximate latitude distribution in color negative
The following table summarizes one way of understanding the approximate latitude distribution of a modern color negative such as Kodak VISION3, using middle gray as the reference. It should not be read as an absolute number. It is a pedagogical tool for understanding why gaining density often improves shadow information, while underexposure pushes the negative toward its most fragile area.
| Exposure relative to middle gray | Tonal zone | Approximate behavior | Typical result |
|---|---|---|---|
| -5 to -4 stops | Extreme shadows | Very fragile information, close to the toe of the curve | More visible grain, weak blacks, possible milky appearance and very little density. |
| -3 to -1 stops | Usable shadows | Usable area, but less robust than the highlights | More delicate tonal separation and greater sensitivity to grain; limited density. |
| 0 | Middle gray | Exposure reference | The point from which shadows and highlights are distributed. |
| +1 to +5 stops | Usable highlights | Especially robust area of the negative | Good tonal retention, stable color, pleasing response and more density. |
| +6 to +8 stops | Strong highlights | Progressive compression in the shoulder of the curve | Soft roll-off and highlights that can still remain photogenic. Very dense, possibly too dense. |
| Around +9 stops | Approximate upper limit | Area close to the useful ceiling of the stock | Progressive information loss, normally less abrupt than in digital clipping. |
Author’s own reference table by Ignacio Aguilar / ON FILM & DIGITAL. Values may vary according to stock, exposure, processing, printing, scanning, grading and working criteria.
Density has a direct effect on shadow texture, color, perceived contrast and apparent grain. When the shadows receive enough exposure, color tends to hold better, blacks can become more solid, and grain feels more controlled. When the shadows barely affect the emulsion, grain becomes more apparent, tonal separation deteriorates, and the blacks can become gray, dirty or milky.
Returning to the previous example, if we shoot at -1 stop, the distribution would shift roughly toward +10 stops in the highlights and -4 stops in the shadows. It is not only a more unbalanced distribution. By placing middle gray lower on the curve, it emphasizes exactly the problem we want to avoid: less useful shadow information and more apparent grain.
In English, this look is often described as a thin negative with milky blacks. It is not simply a dark image. It is an image that lacks photographic density in the lower part of the curve.
Overexposure and underexposure
Moderate overexposure has been a common practice in photochemical cinematography. It does not necessarily mean burning the image or making the final print too bright. It means giving the negative more light than its nominal ASA would require, building more density, and later bringing that density to the desired level in printing, scanning or grading. A 500T stock treated at 400, 320 or 250 ASA is the basic example: more exposure, more shadow information.
Controlled overexposure usually produces a more robust negative. The shadows are better impressed, grain becomes less aggressive, color may hold more consistently, and blacks tend to become more solid once final density is normalized. This is why many cinematographers have preferred to expose the negative slightly above its nominal rating, especially when the aim is a clean, rich and robust image.
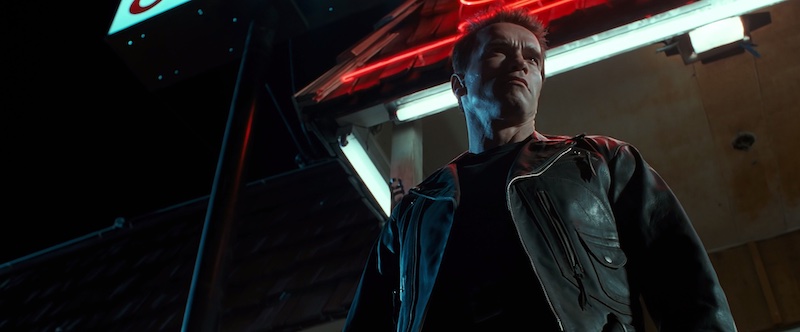
Terminator 2: Judgment Day (James Cameron, 1991) can be read as a classic example of overexposure in night scenes, seeking maximum image quality by rating the 500T stock of the period at lower speeds. Frame cited for critical and analytical purposes.
Underexposure works in the opposite direction. If a stock receives less light than it needs and the image is later recovered in printing or grading, the negative starts from a weaker base. The shadows contain less information, grain becomes more visible, and the image can acquire gray or milky blacks, poorer color reproduction and less solidity.
That does not mean underexposure is always a mistake. It can be an aesthetic decision: a rougher, dirtier, more nocturnal or less comfortable image. But the technical cost has to be understood. With negative film, not everything that can be lifted later has the same photographic quality as what was properly exposed in camera.
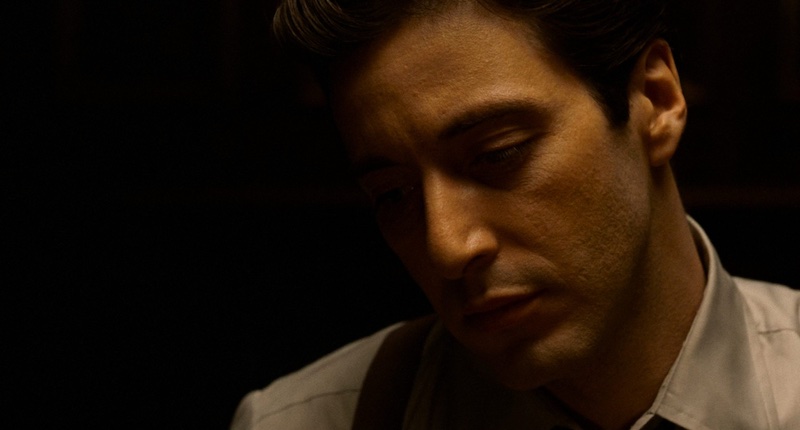
The Godfather, Part II (Francis Ford Coppola, 1974). As in the first film, Gordon Willis treated the 100T negative of the period as if it were a 250 ASA stock, obtaining a darker, more deteriorated and worn image for the historical period. Frame cited for critical and analytical purposes.
Practical idea
Negative film usually benefits from sufficient exposure. When there is reasonable doubt, and as long as important highlights can be held, slight overexposure is often safer than underexposure that later forces poor shadows upward.
Negative latitude and highlight response
Latitude is the useful margin a film stock has to accept exposure variations and still produce a workable image. It is not exactly the same as dynamic range. Dynamic range describes the total capacity of a system to record low and high values at the same time. Latitude describes the practical room within which exposure errors or deliberate choices can still be corrected or integrated satisfactorily.
In the motion-picture negative, a major part of that latitude appears in the highlights. Unlike many digital imaging systems, where highlight clipping can be abrupt, negative film tends to compress information progressively in the upper part of the curve. This softer transition —the roll-off— allows highlights to be overexposed without instantly becoming a flat white patch without information. Even when they are technically burned out, they may still remain visually attractive.
This is one reason why negative film has historically been associated with a particularly photogenic response in high-contrast situations: windows, skies, practical sources, sunlight exteriors or interiors with strong differences between lit areas and shadows. The emulsion is not infinite, but the way it reaches its limit is usually progressive.
In practice, this does not mean that the negative retains unlimited detail in the highlights. It means that information is lost gradually. The top of the curve does not cut off abruptly. It compresses densities, softens the transition toward white and allows a heavily exposed area to remain visually less unpleasant than a hard digital clip. That is one of the keys to the photochemical look in skies, windows and practical lamps.
For that reason, it can be said —with caution— that the negative tolerates overexposure better than underexposure. A highlight may compress and still remain visually pleasing. A shadow that never received enough light, however, will rarely recover color, texture and tonal separation with the same quality. That is usually the main risk to avoid with negative film.
Light metering: measuring light before seeing the result
Light metering is the measurement of light applied to exposure. In photochemical cinematography it is essential because the cinematographer does not have an immediate final image equivalent to the processed negative. The frame can be seen through the camera, a video assist may be available, tests can be made, but the actual density of the negative is not visible on set.
Meter readings and photographic judgment
The light meter establishes an objective relationship between film speed, shutter time, lens aperture and light intensity. But a meter reading does not replace judgment. A reading may be technically correct and still fail to serve the intended image. Metering provides data; exposure interprets it.
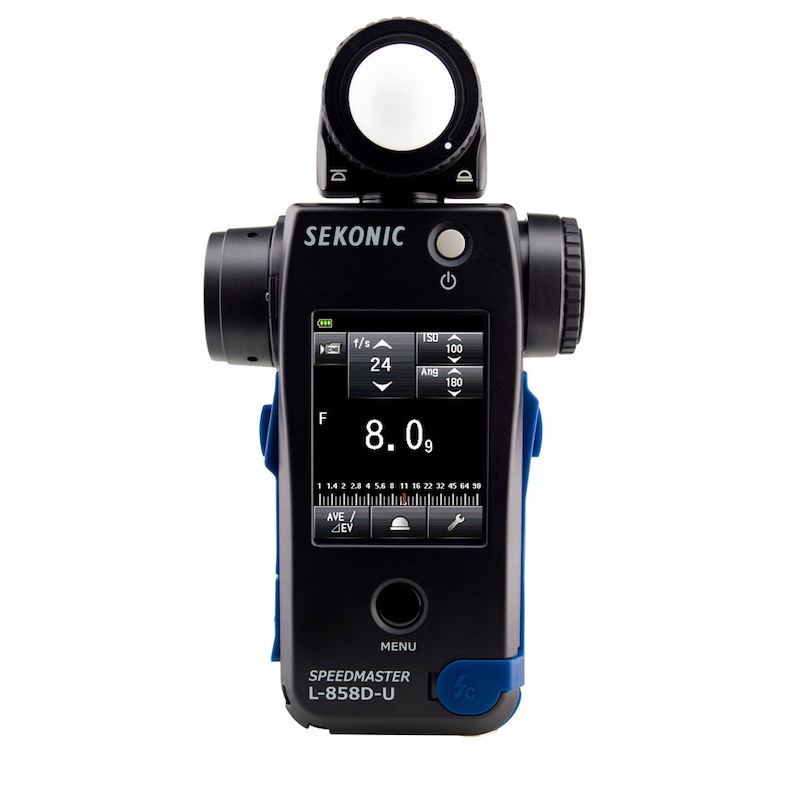
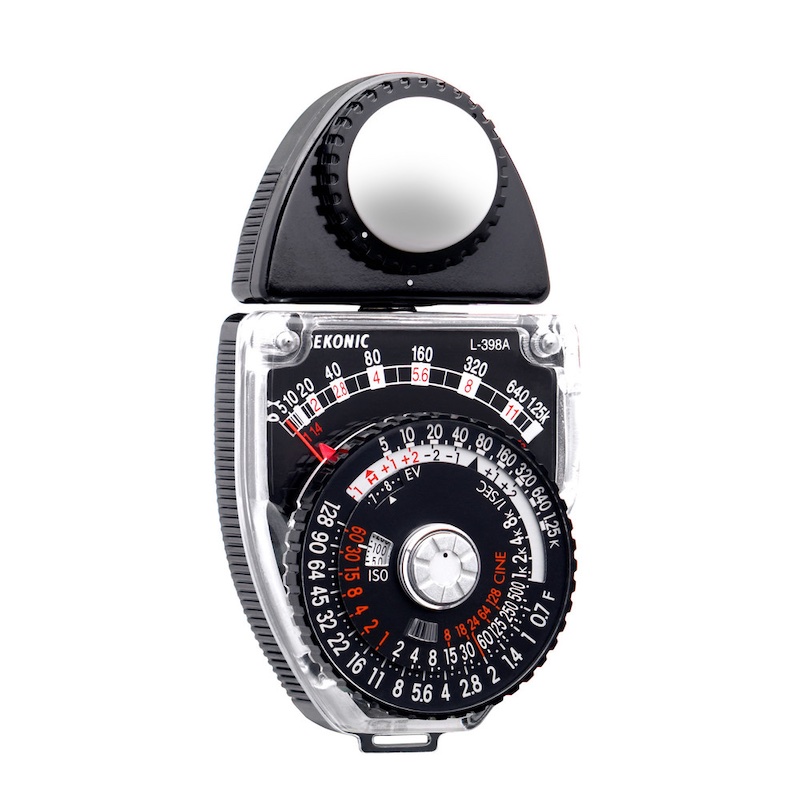
Sekonic light meter with incident-light measurement through the lumisphere and reflected-light spot meter mode for reading specific areas of the frame.
Incident light
Incident metering measures the light falling on a person, object or specific area of the scene. It does not depend on the color, texture or reflectance of the subject being photographed, but on the light striking it. That is why it has been one of the most widely used methods in cinematography.
With an incident meter, the cinematographer or assistant places the instrument at the subject’s position and decides where to point it. Measuring with the dome toward the camera tends to give a general exposure related to the camera’s point of view. Measuring toward the source gives the intensity of a specific light and makes it possible to compare relationships between key, fill, backlight, background or practicals. Personally, this is the way I measure, because it lets me control light ratios more precisely.
There is no single correct direction for every situation. What matters is consistency. Arbitrarily switching between measuring toward the camera, toward the source or toward different units without understanding what is being measured can produce readings that are technically valid but photographically incoherent.
It is worth remembering that an incident meter will generally indicate the stop to set on the lens —for the chosen ASA and shutter angle or exposure time— assuming that the subject receiving that light reflects about 18% of the light falling on it. In other words, it assumes that behind the meter there is what we call middle gray.
Analog Sekonic light meter with incident lumisphere only: a classical tool for establishing exposure from the light falling on the subject.
Reflected light and the spot meter
Reflected metering measures the light bouncing from the subject back toward the meter. Unlike incident metering, which assumes a middle-gray subject, reflected metering is affected by the color, texture and reflectance of whatever is measured. A white wall, a black jacket and a face will not return the same amount of light even if they are lit with the same intensity. Measured this way, they will suggest different stops.
The spot meter is a reflected-light tool with a narrow angle of measurement. It allows us to read specific areas of the frame: a face at a distance, an overexposed window, a cloud in the sky, a lamp, a dark background or any element we cannot physically reach with an incident meter. Its value is not only in obtaining a reading, but in placing that reading within a criterion: how many stops above or below middle gray we want that part of the frame to be.
The spot meter forces interpretation. If we measure a white wall and expose so that the wall becomes middle gray, the wall will no longer look white. If we measure a black shadow and expose so that it becomes middle gray, the shadow will be lifted artificially. Reflected metering is powerful, but it requires knowing what tonal value we want to assign to each part of the scene. In practice, it is normally used to:
- Find the stop for what we, as photographers, interpret as the middle gray of the scene —for example, the face of an actor in the shot—: the value we want to place as properly exposed, our middle gray.
- Check elements that cannot be measured with incident light: how many stops above our middle gray a practical lamp, a cloud, a reflection on glass or a sunlit white car in the background falls; or how many stops below a backlit face or a dark corner of the set sits.
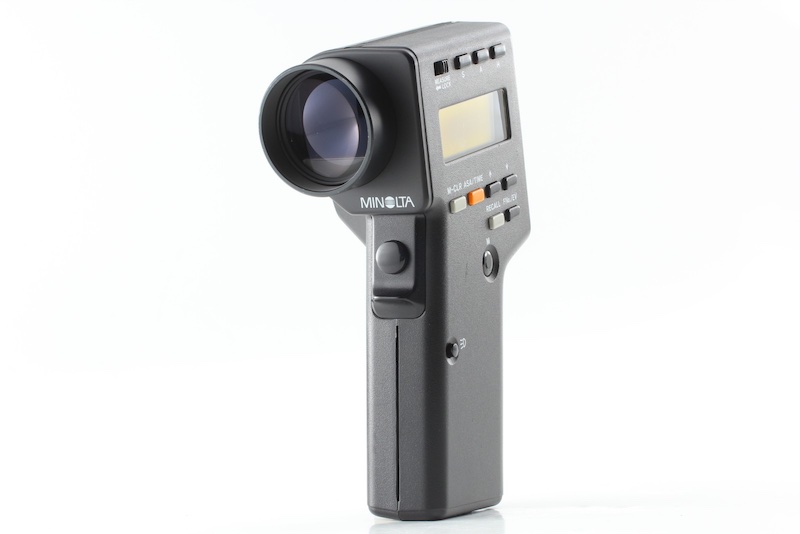
Minolta reflected-light spot meter, used to measure specific areas of the scene and place them above or below middle gray.
Combining incident and spot readings
In practice, incident and reflected readings are not rival methods. They answer different questions. Incident metering helps establish the general exposure and the relationship between lighting units. Spot metering helps check how specific objects, faces, windows, lamps, skies or dark areas fall around that exposure.
Gray card and the Zone System
An 18% gray card provides a standard reference for placing middle gray. It remains useful in analog and digital photography because:
- If it is placed in the key light and measured with an incident meter, the card should be correctly exposed.
- If it is placed in the key light and measured with a reflected meter, the gray card should also be correctly exposed and should indicate the same stop as the incident reading, because the calibration of the incident meter assumes precisely that middle-gray relationship.
- In digital postproduction, especially when grading photochemical or digital material, a photographed gray card exposed as intended tells us where our exact middle gray was and allows us to raise or lower it if it was not placed where we wanted.
It is not an automatic answer for every case, but it is a useful reference for tests, continuity, base exposure and communication between cinematography, laboratory and postproduction.
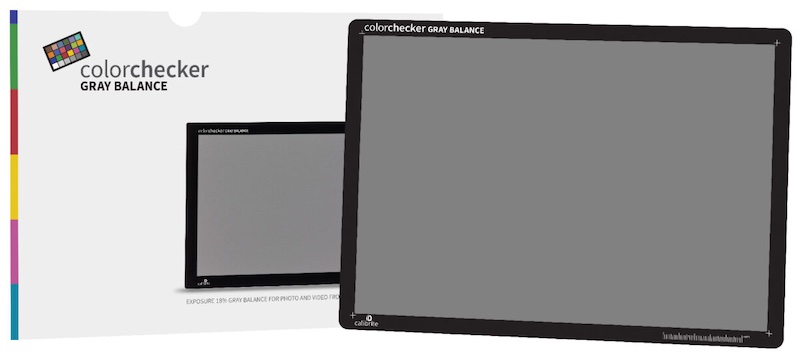
Gray card and color chart as references for exposure, middle gray, color reproduction and communication between cinematography, laboratory and postproduction.
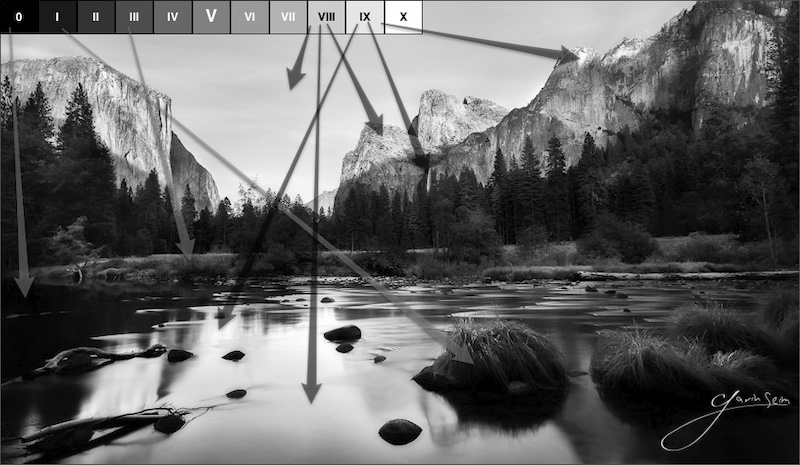
The Zone System, developed by Ansel Adams and Fred R. Archer in still photography, can serve as a conceptual reference for understanding how tonal values are distributed from deep shadows to highlights. In cinematography it is not always applied literally because movement, continuity, printing, laboratory practice, projection and, today, scanning or digital grading also intervene. But it remains a very useful way of thinking about exposure: not only how much a zone measures, but where we want to place it.
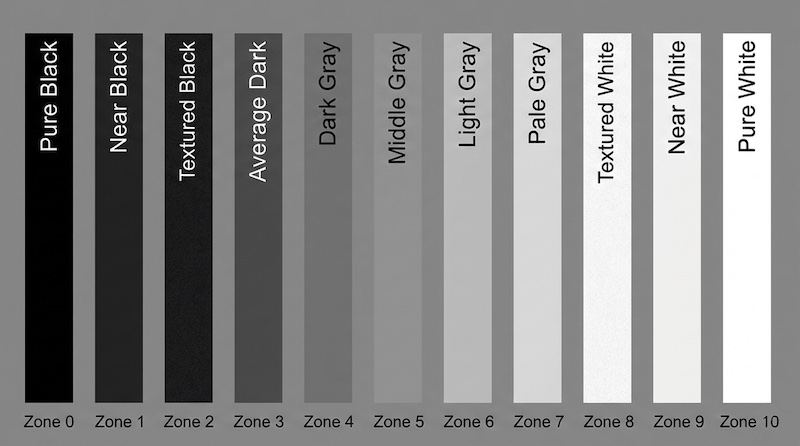
Ansel Adams’s 10-zone system, used here as a conceptual reference for placing tonal values around middle gray. Zone V is middle gray, Zone 0 is pure black and Zone X is pure white. Source: The Monochrome Collective.
With motion-picture negative, that way of thinking is especially useful because the image is not defined by middle gray alone. It also matters how much detail is preserved in the shadows, how much room is left for highlights, what general density the negative will have and how that exposure will interact with the next steps in the process.
Practical application of the Zone System on a black-and-white photograph, showing how different tonal areas can be interpreted relative to middle gray. Image used as an educational reference.
Practical idea
The light meter does not decide the image. It provides a reference. Cinematic exposure begins when the cinematographer decides which areas should be treated as middle gray, which ones can fall into shadow and how much room should be reserved for the highlights.
The video assist is not the negative
The video assist on a film camera helps with framing, action, composition, movement continuity and, in many cases, the work of the director, script supervisor, remote operators or clients. But it does not replace the light meter, and it does not allow the real density of the negative to be judged with precision.
The video-assist image does not come from the processed negative. It is an auxiliary electronic signal, conditioned by the camera, the video tap or capture system, the monitor, its calibration and the viewing conditions on set. It can help show whether a lamp is in frame or whether a shadow feels narratively right, but it should not be confused with a sensitometric reading of the stock.
Contemporary digital tools —waveform, false color, zebras or histogram— can be extremely useful when working with digital cameras, and they can also complement exposure judgment in certain hybrid environments. But they belong to a different logic: they read an electronic signal from the camera or monitor. In classical photochemical shooting, the negative is exposed with light, meter readings, tests and judgment, not with a final image visible in real time.

Brief comparison with digital
With current digital cinema cameras such as ALEXA, VENICE and other systems, EI, logarithmic profiles and viewing transforms influence the practical distribution of margin, noise and the appearance of highlights and shadows. But the logic is not identical to negative film. In celluloid, changing the working EI changes the physical exposure of the emulsion. In digital, exposure, the electronic signal, noise and camera or postproduction processing belong to a different technical chain.
Important distinction
This part focuses on exposure, density, latitude and metering. Normal processing, push-processing, pull-processing, printing, printer lights, Digital Intermediate and processes such as bleach bypass or ENR belong to Part IV.
From exposure to the laboratory
Once the negative has been exposed, the image is still not finished. What exists is a latent image: an invisible photochemical impression that must be made visible in development. Exposure has determined how much information the emulsion received, where the shadows sit, how the highlights were compressed and what general density the material will have. But just as a scene made of many shots is not finished until it has been edited, a motion-picture negative is not finished until it goes through the rest of the process.
- In the traditional photochemical process, exposure is the first stage of a chain that continues with processing and printing. The laboratory can process the negative normally, modify development through push or pull processing, generate prints, interpositives or internegatives, and adjust density and color through printer lights. Each stage can alter contrast, density, saturation, grain, blacks and color reproduction.
- In the contemporary hybrid process —shooting on negative and finishing digitally through a Digital Intermediate, generalized from the mid-2000s onward— the negative is exposed, processed in the laboratory, scanned and then worked digitally. The third stage is no longer necessarily photochemical printing, but scanning, digital color grading and final mastering.
For that reason, exposure is never an isolated number. It is a starting point. It conditions everything that follows: how the laboratory can work, how much the scan can recover, how the colorist will handle shadows and highlights, and how much of the photochemical character will remain visible in the final image.
The negative is generous, but not magical. Its latitude, highlight roll-off and density are powerful tools only if the cinematographer understands where the image is being placed. Exposure, in the end, is not the neutral act of obeying a meter. It is the first creative decision in the life of the negative.
Key Points
- Exposing negative film is not only about obtaining a visible image, but about deciding how much photochemical density the material will carry.
- The nominal ASA is the manufacturer’s starting point; the EI is a working decision made by the cinematographer.
- A slight overexposure usually produces a denser negative, with cleaner shadows and less apparent grain.
- Underexposure can be an aesthetic choice, but it usually produces a thinner negative and more fragile shadows.
- Negative latitude is especially visible in its progressive highlight response.
- The light meter, gray card and spot meter do not replace judgment: they help place the image within the curve of the stock.
Next part in the series
The Motion Picture Negative (IV): processing, printing, Digital Intermediate and special laboratory processes, where the latent image becomes visible and the exposure decisions made in camera begin to interact with normal processing, push/pull processing, printer lights, OCN/IP/IN workflows, scanning and special laboratory processes.
Sources and related reading
- Kodak VISION3 500T Color Negative Film 5219/7219. Source: Kodak Motion Picture.
- Technical Data: KODAK VISION3 500T Color Negative Film 5219/7219. Source: Kodak Motion Picture.
- Current Kodak motion-picture film catalog. Source: Kodak Motion Picture Camera Films.
- The Negative, Ansel Adams. A classic reference on exposure, density, the negative and the Zone System.
- Digital Cinematography, David Stump, ASC. A reference on digital capture, exposure and contemporary imaging systems.
- Reflections: Twenty-One Cinematographers At Work, Benjamin Bergery. Chapter “Film Tests,” by Stephen H. Burum, ASC.
- Masters of Light: Conversations with Contemporary Cinematographers, Dennis Schaefer and Larry Salvato. Secondary reference for interviews and professional comments on exposure, the negative and photochemical processes.
- Author’s own teaching materials on sensitometry, light metering, negative exposure, ASA/EI, characteristic curves, latitude and light measurement.
ON FILM & DIGITAL
© Ignacio Aguilar, 2026.
The Author
Ignacio Aguilar, AEC is a cinematographer based in Madrid, Spain. He is available for cinematography work, creative collaborations, lectures, workshops and international projects. He is a Sony Independent Certified Expert (ICE) and Cooke Optics Spanish Ambassador for Cooke SP3 lenses.